As you all might have already heard that QTP 11.52 is in the market or rather i should say UFT 11.52 is in the market. Thus, in this tutorial, we would discuss and illustrate the installation of UFT 11.52 in detail. In order to make installation easier and simpler, we have tried to include even the minute details. Moreover, the installation steps are clearly mentioned with appropriate screenshots.
To begin with UFT 11.52, we are starting off the article with the un-installation process for the users who have already installed any of the older versions of QTP/UFT.
QTP Un-installation
Note: If there are any Functional Tests that are using the “Service Test” feature in 11.00, contact the “Site Administrator” for upgrade instructions. Tests and Components created in Service Test 11.00 must be opened and saved in Service Test 11.10 before upgrading them to UFT 11.52.
Uninstall QTP 11.0
– Make sure you are an administrator on your workstation.
– Make sure all the programs related to QTP are closed before uninstalling.
– For un-install, navigate to “Uninstall or change a program” option under the control panel.
Select HP QuickTest Professional and then click on the “Uninstall” link.

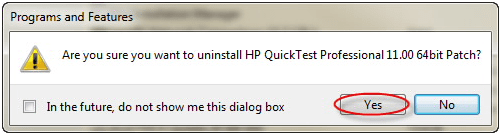
– The system will prompt you to confirm the un-installation. Click “Yes” to confirm.

– Also, un-install HP Quicktest Professional 11.0 64 bit Patch.
![]()
– Similarly un-install HP Run Results Viewer and HP Update.
![]()
![]()
– In order to reflect the un-installation, re-boot the computer.
Now, that we have a fresh machine with no prior QTP installation, let us motion towards much awaited installation process.
UFT 11.50 Installation
Installing UFT 11.50 is a fairly simple process.
I am presuming that you would have downloaded UFT 11.50 from its official website and have kept it at a desired location on to your file system. Please follow the article for the installation procedure.
– Make sure you are an administrator on your workstation.
Double click the setup icon.
![]()
– The user would be prompted to run the software in order to initiate the setup. Click on the “Run” button.

– In the next step, you would be able to view a pop up component links. Click on the “Unified Functional Testing Setup”.

– The next step is to execute the executable for setup. Click on the “Run” button.

– In the next step, the system prompts you to select “Microsoft Office Access database engine 2007”. Select the option if required and click on the “OK” button.

– In the next step, read the Warning and click on the “Next” button if your installation is genuine.

– Read the license agreement carefully in the next step; accept the agreement by clicking on the “I Agree” radio button and Click on the “Next” button.

– Fill in the “Customer Information” by providing your name and organization details. To move ahead, click on the “Next” button.

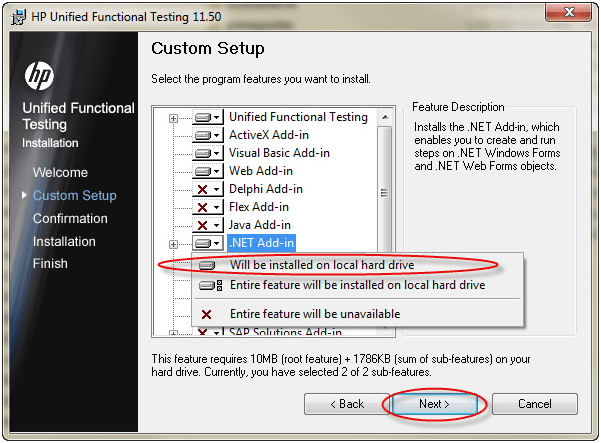
– To customize the setup, expand the “.NET Add-in” and select “Will be installed on local hard drive” option. Click on the “Next” button.
– Browse the desired installation location and click on the “Next” button. User may leave this field unchanged as well.

– Click on the “Next” button. Stay calm as this step may take a little longer.

– Click on the “Finish” button to complete the basic installation.

– In order to install additional utilities, select all the three illustrated options and Click on the “Run” button.

– Select the “Concurrent license” option and click on the “Next” button.

– The next step is to enter the name of your “Concurrent License Server” and click on the “Next” button.

– To finish the license installation, click on the “Finish” button.

– The last step to uncheck the “Show Readme” option and click on the “Close” button.

Thus, the installation completes with this last step. Now that we are done with the Installation; we can start using and exploring the tool.
To launch the UFT you must have got 2 short cuts:
First on the desktop:

Second in the start menu:

After double clicking on the UFT short cut you will see Add-in manager, and from there you have to select the required add-in which you want to use for the particular run:

Loading screen:

And finally our UFT IDE:

Download the latest version of UFT from here.
Stay tuned for more on QTP.