Hello friends!!! I Hope you all have enjoyed recording explained in our previous article. Now let’s have a healthy discussion about what all types of recoding modes are available. But before that let’s discuss the need of different-2 types of recording modes. There are cases when we need to record continues mouse movements, or there are cases when we need to store object on the bases of its co-ordinates, sometimes we need to record images of object, So recording modes are divided into following 4 parts on the bases of requirement:
1. Normal/Default Recording Mode,
2. Low level Recording Mode,
3. Analog Recording Mode and
4. Insight Recording Mode
I would like to tell you one thing here i.e. the sequence in which I have defined the recording modes above is the same sequence of priority, I mean if we are going for recording then first we will try to record in Normal Mode then Low level then Analog and at the end Insight Recording Mode.
Let’s start with detailed explanation of each and every recording mode:
1. Normal/Default Recording Mode:
As the name says this is the default recording mode of UFT/QTP. Whenever user starts recording by default recording done in this recording mode.
This recording mode is used to recognize standard objects of the AUT and save the object properties into the Object Repository (OR), it is also uses to record mouse movements & keyboard inputs.
Let’s have a look at this recording mode:
Start recording by using shown option in the screenshot below:

Once the recording has been started one can see in the below screenshot Normal/Default recording mode is selected by default:
![]()
And this is how scripts recorded in normal mode are looks like:

2. Low level Recording Mode:
Low level recording is used to record mouse clicks, drag & drop, and type operation on an object. But the recording is done on the bases of co-ordinates not its properties and i.e. why this recording mode is known as Low Level Recording mode, because in this mode QTP/UFT records the co-ordinate location of the object on which action has been performed.
This is how UFT will look like while low level recording mode:

![]()
Following is the code of Low level recording mode:

You can see in the above code, mouse clicks has been recorded as coordinates.
3. Analog Recording Mode:
Whenever we need to record continues mouse movements, we can go with Analog Recording mode. The main funda behind this recording mode is it records your continues mouse movements in the form of a track and save this track file on your computer.
Try following steps to record script in Analog Recording mode:
We need to find out the scenario of continues mouse movement, There is a desktop based Flight reservation application provided by HP for practice purpose. Please find below the path from where you can open that application:

You can see in the screenshot there are 2 versions of this application first is for GUI based applications and second is for API, as UFT supports both the types of testing. Please launch “Flight GUI” and login into this app using any username (ex. admin) and mercury as password, and perform the following steps:
- Place one order
- Open that order
- Open Order
- Try to fax order
You will see following window:

Here you need to do digital signature for faxing any order, and to do that you have to perform continues mouse movements, Continues mouse movements can’t be recorded using Normal or Low level recording mode, to do so you have to take help of Analog recording mode.
Start analog recording by changing the mode as shown in the screenshot above, once the mode has been changed you will find following window:

You can see in the window there are 2 options:
1st: “Record relative to the screen” says start recording relative to whole desktop screen that means whatever you are going to perform the task it will record.
2nd: “Record relative to the following window” says start recording on a specific window, once you will select the second option window will look like this:

You can see there is one hand icon just click on it and then select the specific window on which you want to perform recording, After selecting the window the name of the window will be auto populated in text box as shown above.
Now do your signature in the specific block of the window as shown in the following screenshot:

After completing the signature stop recording, and see the UFT script editor. You will find a code like following:

Let’s discuss what this code is saying; this line of code is navigating to specific window on which you want to perform analog recording and calling the recorded script using RunAnalog method.
- Insight Recording Mode:
There are cases when UFT is not able to recognize objects using their defined properties; the reason could be like developer has not assigned properties to object, or the properties assigned to object are not enough that UFT can recognize that object. In this situation we can take help of Insight Recording mode, which records object screenshots and perform actions on that.
Please follow the steps given in the screenshot below to start recording in Insight mode:
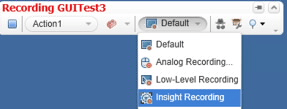
As shown in the above screenshot please change the recording mode to Insight.
Now perform all the action normally on the application and then stop recording, please find below the code generated by UFT under Insight recording mode:

You can see in the screenshot there is an Insight Object at the place of normal object and under that we are passing screenshot of the object on which we have to perform the action.

In the above screenshot we have shown the OR for Insight Objects, you can notice in the screenshot that UFT has stored the screenshot of the object at the place of its properties.
So this was all about recording modes in UFT. Please write us in can of any clarity. We will be glad to resolve your problems.
Our next article will be on different Run modes, stay tuned for the next article.
I have read your blog and I got very useful and knowledgeable information from your blog. It’s really a very nice article. You have done a great job Good presentation thanks for the helpful blog.
Regards,
David,
Very good blog article.Thanks Again. Will read on…