In this tutorial, we would shed some light on a newly acclaimed tool for Mobile Application Testing named as Appium. We have designed the tutorial to show the step by step Appium installation and setup.
Appium (Selenium for Apps) is an open source Automation Testing Framework which specifically caters mobile based testing (works only for iOS and Android applications). To be more precise, Appium automates the following categories of applications:
- Native Mobile Applications
- Mobile Web Applications
- Hybrid Applications
People would have often heard these terms together – WebDriver and Appium. So essence here is that Appium internally exploits the WebDriver protocol for Automation.
Before moving ahead with the setup and installation, let us take a moment to go back and look into the Appium’s history. Appium was originally introduced by Dan Cuellar in the year 2011 when he suddenly felt the need for automating the tests for an iOS product. Appium was originally created as a C# implementation to write javascript commands similar to Selenium structure. Appium was then named as iOSAuto.
It was a the Selenium Conference 2012 in London when Dan Cuellar got the opportunity to showcase iOSAuto to the wide audience from the testing fraternity including Jason Huggins (Creator of Selenium). Jason then realized the potential of the tool and inspired Dan Cuellar to release the tool in the open source space. Tool was then released on GitHub in apparently C# and python versions. At the same time, Jason already started connecting the dots. He implemented a WebDriver wire protocol over http so that the iOS Auto scripts can be written in any programming language using Selenium WebDriver Client Libraries.
Appium/iOSAuto went under several reformation and new avatars were released. So the recent most (as per blogs date) was released in May 2014 as Appium 1.0.
Now, let us move forward with the tool setup and installation. This blog covers the installation mechanism for Windows.
Appium Support
iOS
Mac OSX 10.7+
XCode 4.5+ w/ Command Line Tools
Android
Mac OSX 10.7+ or Windows 7+ or Linux
Android SDK ≥ 16 (SDK < 16 in Selendroid mode)
Appium Installation On Windows:
Pre-requisites
- Java should be installed on the System. Create and set the JAVA_HOME variable to JDK’s home directory. Include %JAVA_HOME%\bin in path variable.
Install Android SDK
- Download the latest version of Android SDK from http://downloads.puresoftware.org/files/android/adt-bundle/.
- Extract the zipped folder into the desired directory on the local file system.
- Create and set the ANDROID_HOME variable to Android SDK’s home directory (D:\Shruti\Softwares\Appium\adt-bundle-windows-x86_64-20131030\adt-bundle-windows-x86_64-20131030\sdk).
- Include %ANDROID_HOME%\tools;%ANDROID_HOME%\platform-tools;%ANDROID_HOME%\platforms in path variable.
Launch SDK Manager
There are two ways to launch the SDK Manager, an application that helps the user to download the tools, platforms etc. from a single stop.
- Go to the downloaded Android SDK folder. A SDK Manager application is located inside. Run the application by double clicking it.
- Alternatively, you can launch SDK Manager from the Eclipse (Windows -> Android SDK Manager) that can also be found inside the Android SDK folder downloaded earlier. ADT (Android Eclipse) looks and behaves pretty similar to that of any other Eclipse IDE.

SDK Manager would be launched as follows:
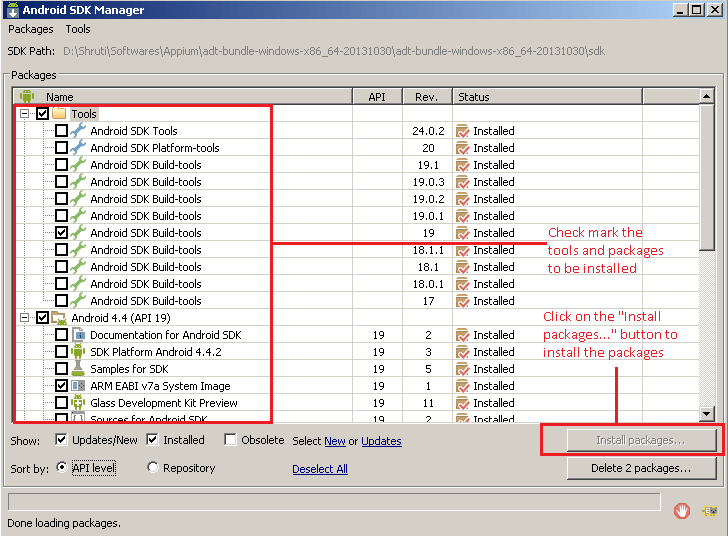
As explained in the image, select the required tools and packages and install them from here.
Launch Android Emulator
Android Virtual Device (AVD) is used to provide the required device configuration with which the Android emulator is launched. An emulator acts as a virtual device in which the Android applications can be installed and run.
Like SDK Manager, AVD can also be easily launched from Android Eclipse by navigating from Windows -> Android Virtual Device Manager.

Creating an Android Virtual Device
An Android Virtual Device Manager lets the user create a new AVD, edit the configurations of an existing one, delete an AVD, repair and to start an AVD.

- Click on the “New” button to create a new AVD. Provide the configuration details for the Emulator Device and Click on the OK button.

- Now select the desired AVD profile created in the above step and click on the start button. Provide the launch options. User can leave the options to be set on default and launch the AVD.

- Now, the user should be able to see the real android emulator.

Install Appium
The easiest of all the steps is to install Appium.
- User can download the latest version of Appium from their official website – http://appium.io/

- Extract the downloaded zipped folder and save it in the desired location on the file system.
- Navigate to Appium folder and execute the Appium application.

- As soon as the Appium is launched, user should be able to see the below screen.

- As the Appium works on the client server architecture, the next step is to start the server. Click on the “Play” icon as shown in the previous screenshot.

With this last step, you have successfully installed the Appium and related software to get started with mobile testing.
In the upcoming tutorial, we would create a real time automation script using Appium and execute it on Emulator. Stay tuned till then….
Thanks for sharing, this is a fantastic article.Really looking forward to read more. Much obliged.